Wednesday, January 28, 2015

DIY Banner with gifts in a box

This post may contain affiliate links.By clicking the link and purchasing items through my links doesn't cost you anything but I receive a small commission.The money helps me buy craft supplies to bring you new creative ideas each week. 

Wondering what this post is all about? Well, it ?it is about expressing your love.Hmm??Still don't it?I thought instead of just saying "I love you ", how about expressing those words with the real words.Yes!! It is about making a garland saying "I love you" with some love poems, gift card , pictures , etc and securing it in a box. When your love opens it, the box says it all. I think writing a love letter has totally become an old style and so to bring it back in a different and interesting way, see ,I came up with this idea.Lets see how to make it.

Easy DIY gift for Valentine's day, anniversary or birthdays

Friday, January 23, 2015

Conversation hearts inspired gift wrapping ideas

Conversion hearts ? Do you like those candies ? I am not a big fan of those candies but I like those little conversation written in the candies.So, with that as an inspiration today I am sharing a few ideas of how you can incorporate conversion hearts in a gift wrapping.


Materials required :
Pastel color cardstock papers
Pencil
Xacto knife/Scissors
Red marker
Clear Tape
Twine (optional)
Anything heart shaped (optional) -I am using a foam sticker

Step 1:Trace the heart shape in the pastel color card stock using pencil. I used a foam sticker as a template but if you don't have anything shaped you can free hand one and use that as a template.


Step 2: Cut the traced hearts with xacto knife or scissors. Write those little conversation with red marker.


Step 3: Stick them in twine with tape and use as a accent to your gift wrap or stick them all around .Or go one step further and write a conversation in sequence.Like" Let's Kiss, My love." Be romantic ;) because it is valentine's day. :)


Hope you are enjoying the gift wrapping ideas.How do you wrap your gifts? Do you like to try different styles in wrapping ?If so, what are those ? Feel free to share them in the comments below. If you are searching for some more inspiration, be sure to check the links below.


Hugs & Kisses(XOXO) Wrapping

Here is a quick last minute wrapping.Wrap your present with kraft paper/any plain wrapping paper.Make a horizontal and two vertical lines with ribbon and secure it with tape at the back side of the gift.Now it looks like as if we are going to play tic tac toe ,isn't?? But  no! we are filling it with hugs(X) & Kisses(O) using markers.Tada!!Now a beautiful Hugs & Kisses wrapping is ready.How simple is that ??Do you like this ??


Follow my blog with Bloglovin

Tuesday, January 20, 2015

How to make Emoji Coin purses - Valentine's day special

In this smartphone world, everyone uses emoji's in their conversation to express their mood whether it is a love <3 or a smile :) or an angry face :@. I personally love to use emojis in my conversations and getting so used to that makes me feel the plain(without emoji's) conversations little odd .(Hi5! If you also feel the same:P). So I decided to make this valentine's day post inspired by the love emoji's. By this time you would guessed it from the title and yes it is Emoji Coin purses.Lets see how to make it.Ready?

crafts using emojis - DIY emoji coin purses


Materials Required :
Solid yellow cotton fabric (A fat quarter is sufficient for four coin purses)
Red printed cotton fabric (A fat quarter is sufficient for four coin purses)
Interfacing (A fat quarter is sufficient for four coin purses)
Zipper or snap fastener or Velcro
Fabric markers
Sewing machine or fabric glue
Fabric scissors
Anything round to use as a template(I used a jar lid which is about 4.5")
Marker for tracing
Iron

Step 1: Use the template and cut 6 pieces of circles (2-yellow, 2-red print & 2-interfacing).Iron the interfacing with the yellow circles.


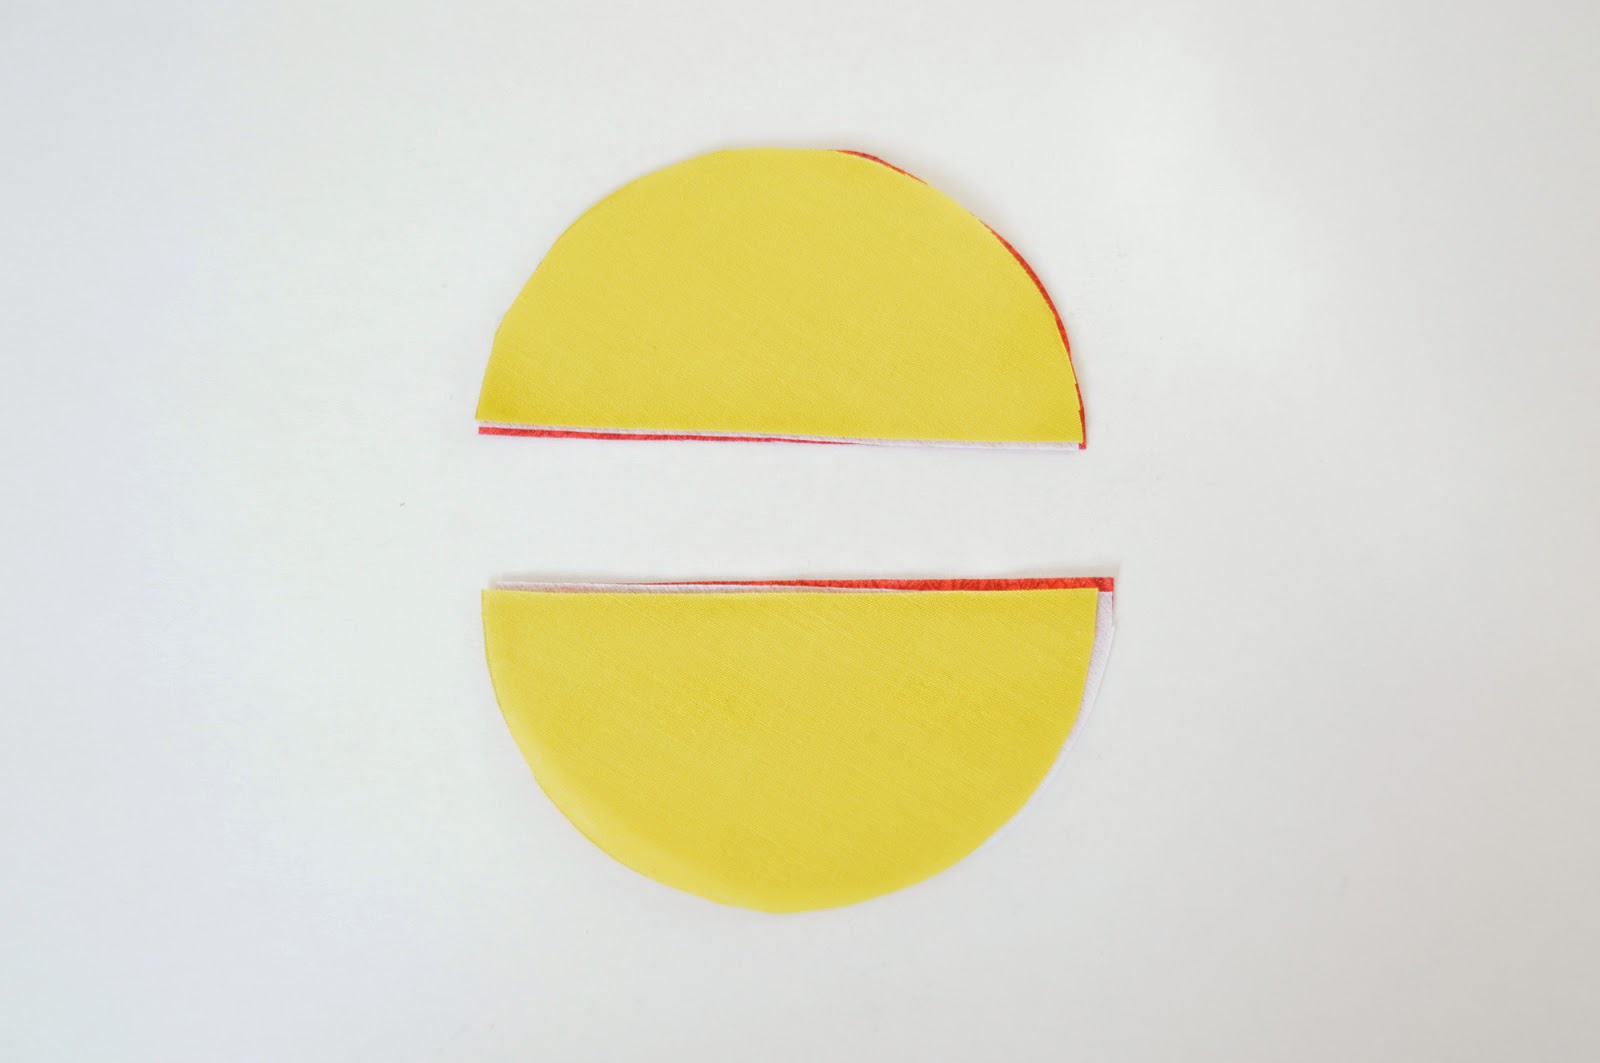
Step 2:Take one set of the circle pieces (1 yellow with interfacing and 1 red piece) and cut it in half with fabric scissors.

Step 3: Now take one set of half circles. Place the red half circle right side up,then zipper right side up and yellow circle with interfacing wrong side up so that all the pieces align along the zipper edge. Make a stitch with 1/4" seam allowance.(I used 1/4" seam allowance because the zipper I am using is 1" wide and if we use two 1/4" seam allowance we are subtracting 1/2" but adding 1/2" in the middle of the zipper, so the math will work perfectly.)


Step 4: Repeat the same with another set of half circles.


Step 5: Make a top stitch 1/8" away from the edge and keep the zipper half opened.


Step 6: Place another set of circles with yellow circles facing each other.Make a stitch all around with 1/4" seam allowance.


Step 7: Trim the seam allowance to reduce the bulk and also trim the zipper.Use the zipper opening and turn inside out.


Step 8:To secure the zipper, use a needle and thread and make a couple of stitches at the edge. I used a studded trim from my stash to secure the zipper. I thought this eliminates a step and also adds a cuteness the purse.(What do you think of this idea ??)


Step 9: Take your fabric markers and draw your favorite emoji that your valentine would love to receive as a gift.I used Heart eyes emoji, here.


Alternate Version :
Instead of zipper , you can also use snap fasteners, buttons or velcro to make this purse. The only modifications would be you have to cut the circles into two parts which slightly overlaps one another and also the top flap should cover the bottom part.To do this, trace the template onto a piece of paper and make two paper template. Draw the bottom part first , add 1/4" seam allowance and cut it. place that pattern above another paper template and mark the corners where it needs to be overlapped (May be 1/4")and connect it by drawing a curve.This serves as a top flap template.Cut it with 1/4" seam allowance.Here is how the pieces look.


Step 1: With right sides facing each other, make a stitch with 1/4" seam allowance and turn it around and make a top stitch.Do this for the bottom part and top flap.

Step 2: Mark and sew the fasteners, whichever you prefer.I tried with velcro and snap fasteners.

Step 3: Place the set of full circles with yellow circle facing right side up,then top flap with right side facing right side of the yellow full circle and then the bottom part with sides overlapping the top part.(as shown).Make a stitch all around the circle with 1/4" seam allowance and turn inside out.Draw your favorite emoji with fabric markers.Voila ! Your Emoji coin purse is now ready to express your love <3.


Do you like these Emoji coin purse?How will you feel if you receive this as your valentine's day gift? Is there any favorite emoji that you use often?Feel free to share them in the comments below.As always I will be happy to hear from you.

This post is a part of Spring Craft Blog Hop 2015.Be sure to check that and link up your DIYs & crafts which are valentines day, President's Day or Mardi Gras.


Spring Craft Blog Hop 2015

Welcome to the first spring craft blog hop challenge for the spring season! We're challenging you to create and share a Valentine's Day, President's Day, or Mardi Gras craft tutorial. This hop will run from January 20 - February 17 and you can share your creations in the link-up at the bottom of the post.

. Spring Craft Blog Hop

Meet all 18 hosts!

*Please follow your hosts on at least one or more social media platforms of your choice. Let us know you're following from #SCBH2015*

Spring-Craft-Blog-Hop-1

Grab a button and help us spread the word!
My Pinterventures


Here is my post for your inspiration , Do you like emoji's ? Then this will be a perfect gift for your valentine. Check this post to learn "How to make your own Emoji Coin purse"


NOW TO THE RULES:
  1. Link-up your craft or DIY tutorial that fit the themes of the Spring Craft Blog Hop.(Valentine's Day, President's Day, & Mardi Gras) Links that do not fit the themes will be deleted.
  2. DO NOT link-up food or recipes.
  3. DO NOT link-up round-ups unless all the craft posts are yours.
  4. Link directly to your post and not your blog.
Show us what you've created and be seen on 18 blogs!

Friday, January 16, 2015

Gift wrapping with tapes and pipe cleaners

Do you always use ribbons to embellish your gifts ?Then you are missing a lot of fun.Today I am sharing a few alternate things that you can use to embellish your gifts.When I started to wrap this gift , I was like you searching for ribbons but I couldn't find the right color and size that matches the idea I had in my mind .So, I came a little down (Down I mean , I have ribbons on the top and tapes down in my new organizer, if you missed my organizer post, click here) and thought why not tapes instead of ribbon. I actually thought of using two different sizes of ribbons since I did not have ribbons I made it with duct tape and washi tape. Lets see how.


Materials required :
A wrapped gift
Pipe Cleaners
Duct tape
Washi tape
Twine
Scissors

The materials mentioned above are used by me in this gift wrapping however you can change them according to your desire.Play with combinations of materials and I am sure you will end up in a beautifully wrapped gift.Now to the steps.

Step 1: I used a plain gray wrapping paper to wrap the gift and started with duct tape. Paste white duct tape around the gift and layer it with the washi tape. I used a plaid pattern washi tape as I am going to use red and black pipe cleaners for monogram.


Step 2: Take a long piece of twine and make a double knot in the middle to form a loop. This is to hang the monogram .


Step 3: Twist two colors of pipe cleaners and make the monogram(By twisting and bending) . I used the first letter of the person's name whom I am giving the gift.I used two colors to add a pattern but you can also use single color pipe cleaner.

Step 4: Hang the monogram in the loop you created with twine.And stick a small heart sticker to mask the knot. That's it !! You now have a beautifully wrapped monogram gift.


Some other letter "Monograms"


A little variation :

The monogram can also be made from a card stock paper .I used pipe cleaner as it is the easier way to make a monogram but you have varied options like this card stock one. I just drew a the letter with pencil and cut it out with Xacto knife. In this case , you have to pass the twine ,make a knot and then tie it around the gift.I made this little girly, by adding a flower sticker to mask the knot.


It need not be a monogram, you can also make a heart with the pipe cleaners and glue a foam letter inside it and make it a valentine's day wrapping.This would be a perfect wrapping for the men in your life.


What do you think ? Isn't it easy with tapes compared to ribbons ?Do you use tapes or any other materials to gift wrap ? Feel free to share in the comments below.